Lunes, Nobyembre 25, 2013

Samsung GALAXY Y (young) GT-S5360 Hang on Logo Only or Restart Solution Via Odin

      Hi There, In this tutorial, I will give you the procedure on how to Resolve the problem of your Samsung Galaxy (Young) GT S5360 that hangs in logo or always restart problem.

     First you will need this tools..
Odin 1.84
samsung galaxy y GTS5360 File and
Samsung Usb Driver for Mobile Phones
why Odin 1.84? it's because 1.85 didn't recognize some of samsung galaxy S5360 unit.

    PROCEDURE: 1


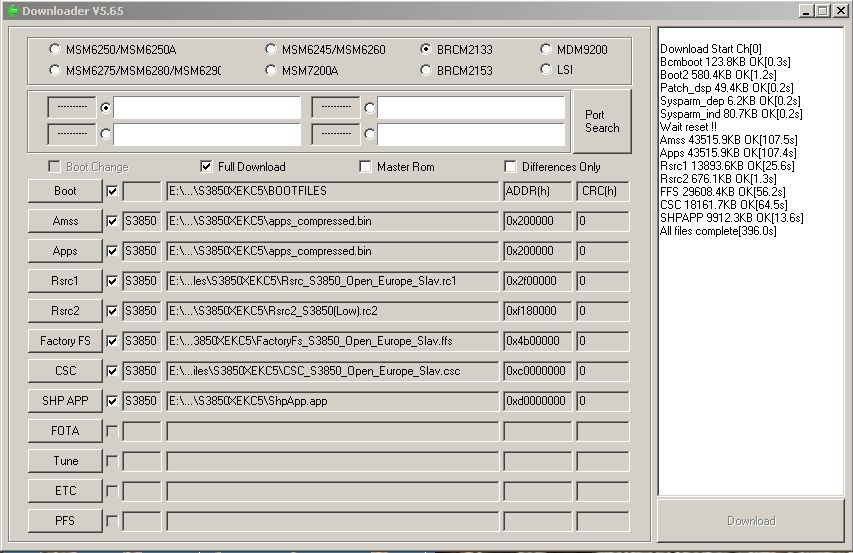
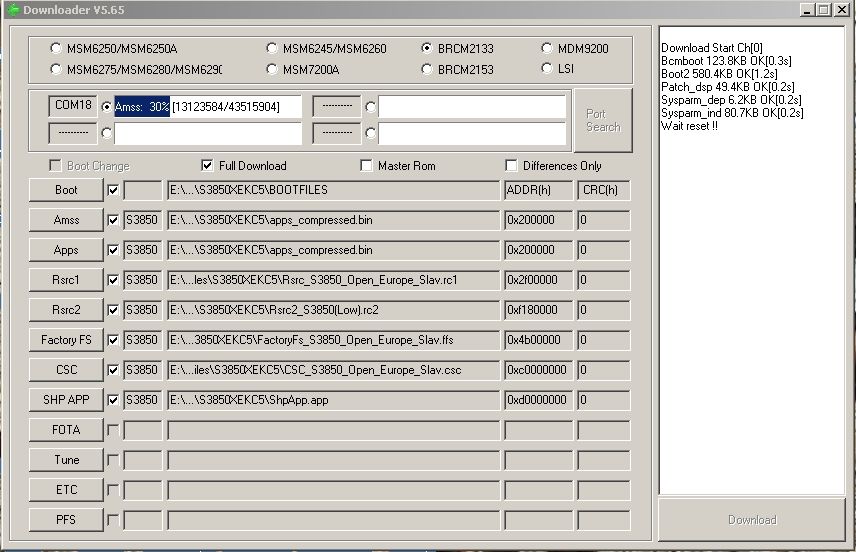
1. Press VOLUME UP + HOME + POWER and wait until the phone enter the Android System Recovery then select wipe date/factory reset & wipe cache partition..
2. Then Select Reboot.
3.You can highlight it using volume UP and DOWN and Home Botton for Select.


     If it is Still not Works, This next procedure will done that.

    PROCEDURE: 2


1. Turn off your phone
2. Remove your SIM Card and SD Card
3. Extract previously downloaded firmware

4. Open ODIN 1.84 on your PC
5. Select from extracted archive: OPS-OPS, Bootloader, Phone-MODEM, PDA-CODE, CSC-CSC (leave EFS and One Package empty)
 just follow the picture for refference....
6.Connect your phone via USB into PC
7. When the screen is turned on hold POWER+VOLUME DOWN+HOME and then Press Volume UP to enter to Download Mode...
8. If ODIN detected and recognized your phone should light up the first square to the left side
9. Press “Start” button and wait, the process should take ~5 minutes
10.If all goes well your phone should reboot automatically
11. Square should change the color to GREEN and display “PASS” it means that flashing process was successful!!!
   That's It... Your Phone will now FIX and ready to use again!!!


PS: Take Note that i Will not be liable to any damage of your Phone. Do it at your own risk. But for me It work's perfect and fine....


Sabado, Agosto 24, 2013

How to Reinstall Windows 7 Without Formatting the Hard Drive

     It is very common for WIndows OS to become sluggishly after some time, but when it reaches the point where you can’t get anything to run properly, you know that it is time to do a re-installation. For my Windows 7 machine, after countless installation/uninstallation of various applications (all for testing purpose), it starts to give way and behaves abnormally. Apps start to run sluggishly and I can’t even get the Windows update to function. The best choice for me is to reinstall the OS.
However, most people don’t like (or even hate) to do a reinstallation because it means that they have to reformat the hard drive and probably lost some of their precious data. The fact is, you don’t really have to reformat your hard drive to reinstall the OS. Even after the reinstallation, your data will still be intact. Here’s how you can do it.

NOTE:

 1. Reinstallation of Windows 7 will wipe the system folder, Program Files and My Document folders. All the applications that you have previously installed will be lost. However, any other user-created folders in the C: drive will still be intact.


2. As usual, do a backup of all your data before you attempt to follow this tutorial.

3. Make sure you have the installer DVD, or the USB drive in hand.

        Reinstall Windows 7 without reformatting the hard drive

1.Turn on your computer and load up Windows.
2.Put in the installer DVD (or plug in the installer USB).
3.A window will popup to ask if you want to “Run setup.exe” or “open the folder”. Select “Run setup.exe”. If this popup window didn’t appear, open your Windows Explorer, navigate to the DVD drive and run the setup.exe file.


4.The Windows 7 installation page will appear. Click “Install Now”.


5.On the next page, select the option “Go online to get the latest update for installation”.


6.Accept the license term and click Next.


7. Select “Custom”.


8. Choose the partition that you are going to reinstall the Windows OS. This is usually the C: Drive. It will then show a prompt saying that your existing files will be backup to the windows.old files. Click Ok.


9. Lastly, you just let the installation do its work. Once it is done, it will reboot and prompt you to setup your account. After you have login to your account, you will find that all your data will still be intact. At this point, you might want to reinstall all the usual software.


What to do after a reinstallation?

Now you have a clean system, it is best to do a system backup and create a system restore point. In the future when your Windows messed up again, you can simply restore to this clean state.

That's It!  You already Reinstall Windows 7 Without Formatting the Hard Drive...

How to Install Windows XP Without Formatting

      There are different reasons why a reinstall is required. Some of the most common ones are missing .dll files or too many virus or spyware attacks detected. Or it could be the desire for a seemingly new operating system (OS). After years of removing and adding programs and files, your system is scarred by the residual files. The easiest way to reinstall Windows XP without formatting your hard drive is by choosing the "repair install option." This installs XP to pre-SP2 (Service Pack 2). Service Pack is Microsoft's security upgrades and bug-fixing feature.


Instructions


Things you'll need
 Windows XP CD (either store-bought or original from computer manufacturer) Printed instructions


The basic Re-Installing


1.Insert the Windows XP CD into your computer, disconnect your computer from the Internet, and reboot (or restart) your computer.

2. Your computer should automatically direct you to a screen with options for reinstallation. Do not click on the option that mentions "recovery console." Click the option for "installing Windows."


3.Accept the agreement, and on the next page you will choose an install option. Press "R" for repair, and continue.


4.Follow the on-screen instructions till you're done. At the end of the process, all your previous settings, files and programs will remain untouched, and your system will run without qualms.


5.Don't forget to immediately update your computer by downloading SP2 from Microsoft's website download link

6.  You can wait until Automatic Updates detects SP2 is missing, but it is not recommended.


Tips and Warning!


     If this doesn't work, search for methods using partitions. A system with too many vulnerabilities should go straight to a format and clean installation of XP.

      Don't forget to disconnect from the Internet; your computer is most vulnerable during the install process if connected.

How to Repair Windows XP Without Reformatting

         Repairing Windows XP without reformatting is a fairly simple task. The repair process requires the Windows XP installation CD. Repairing
Windows XP will fix certain problems on your computer, but some of your programs may not work afterward, and you may have to re-install
software patches.

 Instructions 


1. Back up your files and data if possible. Repairing Windows XP should not damage your data, but if something goes wrong, the backup will ensure you don't lose everything. Write down your Windows XP product key. The product key should be on the COA sticker on the front, side, or bottom of your computer. Do not proceed without the product key, as you may not be able to complete the repair.

2. Uninstall Internet Explorer 7 or Internet Explorer 8 if present on your computer. Repairing Windows with Internet Explorer 7 or Internet
Explorer 8 installed will typically break Internet Explorer.
To uninstall, click your "Start" button and open the Control Panel. Open "Add or Remove Programs." Highlight Internet Explorer 7 or Internet Explorer 8 and choose "Remove." The program will disappear from the list when removal is complete.


3. Insert your Windows XP disk and boot to it. Keep a close eye on the process--you may be prompted to press a certain key to boot from CD.
Windows installation will load a blue screen with status updates and instructions. Whenever the installation process is waiting on your
input, it will give you a selection of answer choices either on the screen or on the gray bar at the bottom of the screen.


4. Press "Enter" at the "Welcome to Setup" screen. Press "F8" to accept the license agreement. Press "R" to repair the existing installation. The file installation process will run for a few minutes with no further intervention. After file installation, the repair process will launch the standard Windows XP installation, which runs for a few minutes before asking you for information.

5. Set your Region and Language on the "Windows XP Professional Installation" screen. Click "Next." Enter your Workgroup or Domain name. This screen may already be populated with the information in your existing Windows XP installation. Click "Next." The repair installation process will finish with no further intervention, and may take 20 to 60 minutes, depending on the age and speed of your computer. At the end of the process, the computer will restart and launch Windows.

6. Follow the on-screen instructions through Windows XP's setup wizard. If asked "Who will use this computer?" you must create at least one new user, even though your pre-existing users may be available within Windows, itself. Click "Finish" on the "Thank you" screen. It will take a minute or two for Windows XP to finish loading Windows with the information you just provided.

   Tips and Warning!!!!


   If your computer does not give you the option to boot from CD, you must change the boot order in the BIOS. Entering BIOS requires you to press a particular key immediately when the computer starts. The key varies from BIOS to BIOS, but is usually "F1," "F2" or "Del."


  Run Windows Update immediately after completing your Windows XP repair. Windows Update will download and install security patches that were overwritten during the repair process. The longer you go without running Windows Update, the more likely it is you'll get a virus or work due to an unpatched security hole.

Linggo, Marso 24, 2013

Resetting Samsung Corby 2 S3850 with Multiloader

             Hello there, In this tutorials i will teach you how to reset your  Corby 2 S3850 using multiloader. You can do this if your phone hangs, stock in welcome Logo, start and then reboot again.
TAKE NOTE: if your CORBY 2 is android supported, you don't need to do this.
first you need this thing :

1.Multiloader download here
2.samsung USB driver download here
3.S3850XEKC5 download here
4.USB cable for samsung

            If you download and install samsung driver already let's proceed to the next steps.

1.first, put your corby  Handphone to Download mode - press (Call/Green +volume up + Power ).
2.extract the s3850XEKC5
3.copy the picture as reference
http://i302.photobucket.com/albums/nn83/errolkristine/mult.jpg


4. if you copy it already connect your phone to USB and connect it to your desktop.
5.there's a prompt that say install samsung driver etc, etc. install it and make sure that it will say's installing complete for the download botton will available to press.


6.Now, if you already press download and it will look like this
http://i302.photobucket.com/albums/nn83/errolkristine/multi.jpg
7.wait till it all finish and your phone will boot and look like this


8.When it all finished, That's it!!!!!! your phone now have a new firmware and ready to use.

   IF YOUR PHONE IS ANDROID SUPPORTED YOU CAN TRY THIS TO RESET YOUR PHONE.
take note: "all off your data will be lost"
1.Turn your corby 2 off, press the volume up botton, menu, amd power botton at the same time.
2.Select wipe data factory reset using Volume key. "all data will be lost".
  ANOTHER WAY OF RESETING YOUR CORBY 2
1.Use this method to hard reset your Samsung Corby 2 android supported phone. ENTER *2767*3855#. Warning!! all your data will be lost including your contacts,messages, etc. copy all your data/contacts/sms to SIM and make a backup to your computer before full or hard reset it. Take out your simcard also before doing a full rest......

Lunes, Marso 18, 2013

Flashing nokia phones with a USB data cable


               In this tutorials i will teach you how to flash your nokia phones with a USB data cable.
you will need:
1.Phoenix test and service software for Nokia phones
2.Internet connection
3.USB cable for your phone
4. Use GOOGLE or Navifirm to download your firmware.
Select APAC / EMEA based where country your cp from.


TAKE NOTE: you need to backup your phone content. Because phone internal memory will format during the flash process...

1.download and install Phoenix test and service software for nokia phones  You can download it here phoenix 1 or phoenix 2
2. Remove sim and memory card form the phone and Switch it On.
3. Close nokia pc suite if you have install it in your computer.
4. Start the software. You can see it like this

 5. Now connect your phone to computer using USB cable, choose usb port where your cp connected.
it will show you what RM version of your phone.

6.click File > open product in the upper left side of the software

7.select the RM version of your phone


8.choose your desired product code and click refurbush


9.After that YOUR PHONE WILL START TO UNDERGO FLASHING.

AFTER SUCCESSFULLY FLASHING. IT WILL RESTART ON ITS OWN.


That's it!!!! you now successfully flash your nokia phones.......

Nokia dead phone "FLASHING" using phoenix tutorials...

             In this tutorial, i will teach you how to flash a nokia dead phones via phoenix. This tutorial still works! "so please" FOLLOW the instructions carefully. Use GOOGLE or Navifirm to download your firmware.
Select APAC / EMEA based where country did your phone from.


            TAKE NOTE: 100% Working on WIN XP - download and use the PHOENIX version attached with this tutorial. Refer to instruction no.3 below.
Tried it on WIN7, just download and install the latest phoenix version  "run as administrator" 

            You will ONLY need internet for downloading the files. After installing all files, NO NEED FOR ACTIVE INTERNET CONNECTION while doing the flashing.

DISCLAIMER: 
I will not be held responsible if any mishaps while/after flashing will occur (please follow the instructions posted here to avoid issues). This tutorial may or may not work for you, therefore please don't expect full compatibility on all firmware versions.
You may lose any warranty by flashing the phone. 


YOU'LL NEED:
1. Compatibe Nokia USB cable.

2. Phoenix Software - for win xp - download and use the phoenix on the link below..

3. LATEST Firmware - use google to search for FW.

4. Your DEAD NOKIA CELLPHONE.


 WHAT is DEAD phones?  dead phones means, When you turn on your cellphone you only have White Screen but it WILL NOT CONTINUE TO TURN ON.
VIBRATES but no WHITE SCREEN - this is a different case. You may have hardware problem. You can still try this tutorial since you have nothing to lose.


 INSTRUCTIONS:
1. Turn off cp -> remove battery -> look where your cp was manufactured -> note the RM version & the 7 digit product code
(Ex. Made in China, RM-346, Product code - 0576672)

2. Download & Install the compatible firmware version for your cp.
3. Download and Install PHOENIX.
DOWNLOAD HERE --> phoenix 1 or phoenix2. 


NOTE: If any ERROR APPEARS ON INSTALLATION -> JUST CLICK CONTINUE ANYWAY.
For Win7 users: Run as administrator


STEPS FOR DEAD PHONE FLASHING: 

THIS IS FOR WIN XP:


AFTER STEP 12. YOUR PHONE WILL START TO UNDERGO FLASHING.

AFTER SUCCESSFULLY FLASHING. IT WILL RESTART ON ITS OWN.

if not... JUST RESTART IT MANUALLY ---> THAT'S IT!!! 


For windows 7  It is almost the same with win xp.

( credits to sir  yehs14 of SB for teaching me this...)

How to format your computer Windows Vista


            In this tutorial we will install a Windows Vista, people format windows vista in try to fix their system, repair some functionality or upgrade from windows XP. If you are not sure about your system hardware compatibility with window vista check it here windows vista compatibility. Also make sure that you have the Drivers CD (that came when you’ve purchased your PC), or if you don’t have them, download the latest Vista drivers for your hardware (you can find them at the support section of your hardware manufacturer, remember to save them to different partition than “C:” (don’t save them in MyDocuments folder, it will get deleted with the formatting), safest way is to store them in other partition than C: (ex. D: , E: , removable drive like USB or burn them on a CD/DVD...
       
            If you are sure that your PC is compatible with Vista, and you have all the drivers saved, you can proceed with Formatting Windows Vista. ok let's start.....

1. Insert your Windows Vista DVD. The DVD is bootable so after you restart your PC with the DVD inside the Windows Vista Setup will begin loading. "if the setup doesn’t start automatically, make another restart and press F2, or F8 after the boot screen and select boot from DVD ".
  
2. The first screen of the Format Windows Vista sequence will show up. At this point you need to select your Language and Time and currency format "click the image to enlarge". Press "Next".

3. Press Install Now....

 4.After a minute you will be asked for your Product Key.
         option 1:If you don’t have your product key, you can skip this step and at the next step you will be asked to pick Vista Package that you want to install. "Vista Home Basic", "Home Premium, Business", "Ultimate". If you install windows vista without providing product key, after 14 days you will have to enter a valid product key, or if you don’t, you’ll be forced to format windows vista again. "Take note" This is good if you want to test which windows vista version is best for you, before your purchase.
         option 2:You enter your product key, and at the next screen your purchased version will be auto-recognized.

 5. Accept the Microsoft Windows User License Terms and press "Next"

 6. A message appears – “Which type of installation do you want ?”
        option 1: If you already have another operating system installed (ex. Windows XP) you will have the Upgrade option enabled. It’s up to you to decide if you prefer “clean” install or upgrading from previous Windows Installation. Clean install is recommended for improving system performance, and Upgrade Setup is recommended if you have some files in your C: , My Documents, or Desktop folders that you don’t want deleted.
        option2:  You already have operating system installed but you want to format your drive, deleting the old system and installing fresh Windows Vista copy. In that case select the C: drive and press Format ( don’t format all drives! only the primary where we are installing Windows Vista – ” C: “. The setup will do the rest.

 7. Select Disk 0 and click "Next"

 8. The copy process will begin. This process can take some time, so wait a bit, make a coffee and get some magazines to read.

9. After Windows Vista Setup finishes, the computer will reboot.

10. Windows Vista files are copied , and now setup will configure Windows Vista for your PC. This step will take some really good time.

11. Installing Windows Vista finishes, insert your User Name and Password here.

12. Give your PC a name! and select one of the colorful backgrounds.
Select your preferred security settings. If this computer is not behind a firewall, the best option is the ” Use Recommended settings”. If you are using firewall then you can select “Install important updates only” (Windows Update). If you want to be protected and your Windows Vista to have the latest updates from Microsoft , select the first option.

13.Select your time zone and location, Network Configuration – Select your computer location. This settings sets your network permissions.

14. Welcome to your new Windows Vista Operating System, After you press Start, some Windows Vista settings will be upgraded automatically.

15. You now need to install some drivers that the system will not install automatically.

              It's finished!!!!! you now install windows vista to your computer!!!!

Sabado, Marso 16, 2013

How to format your computer Windows 7

      
      In this tutorial i will teach you how to format your computer using windows 7 CD. windows seven is better than the other previous windows like xp and vista. The install process is very simple and easy to follow. Ok now let's start..

1.Insert your Windows 7 Boot Disk into your DVD or CD drive and reboot your PC.
2. While the PC is rebooting, It will prompted ” Press any key to boot from CD…” Just press any key here
3.After you press a key, windows will load installation files.
4.Windows 7 setup will start
5.Select your language, time and currency format and keyboard input (US) and Click Install Now to  proceed
6.Setup will load for a min or two, If you do, select I accept the license terms and click Next
7.If you are upgrading from Windows Vista select Upgrade, if you had Windows XP you have to select Custom (Advanced). Upgrade from Windows XP to Windows 7 is not available. Click Custom (Advanced)
8.Select the Partition where you want to install Windows 7 and click Next. You will need at least 5716mb free space.
9.If you don’t have enough free space to Install Windows 7, you will receive the following warning
10.If that’s the case, you will need to format the partition where you previously had Operating System installed. TAKENOTE: Formatting a partition will erase all existing data on the partition, proceed only if you have backed up all your files!
11.If you want to format the partition, go to Drive options, and format the partition where you want to install windows 7. Again, do this only if you have backed up your documents or your files!
12.click format and then yes
13.After you press Next, Windows 7 Installation will begin. Approximately takes about 30 min to 1 hour to finish, depending on your computer speed.
14.After half an hour, setup is complete and windows 7 installation is almost finished. Few more minutes.      

15.Now your computer will reboot, since the Windows 7 DVD boot disk is still in the drive, the message press any key to boot from DVD will appear. We already did that, so this time DO NOT press anything. Just wait 5 sec and your PC will continue booting and finish installing your operating system.Windows will continue booting and installing, Finally!
16.Insert your name (this will be your windows username)
17.If you want to, insert password for your computer. be sure that you wont forget it!!!
18.Insert your Windows 7 product key and press Next
19.Do you want Microsoft Updates for your new operating system? It is highly recommend you know…! Select use recommended settings, It’s time for Time zone, select yours from the drop down menu Depending on your location, select the appropriate network location.
20.If you have more than 1 computer, type homegroup password for sharing files. Make sure to remember it
21.Windows is finalizing your settings, Can you see the finish line ?we’re almost there
22.That’s it. Now insert your computer manufacturer drivers CD and install drivers. Windows 7 has great driver support, go to Start –> Control Panel –> Select View By = Small Icons –> Click Windows Update
23.Check for updates and click on optional updates, to see which drivers windows 7 found for your computer automatically.
           And that's it!!!! It's Done!!!!! You install windows 7 on your computer.............

How to format your computer Window xp

           
           In this tutorial i will teach you how to format your computer using windows xp CD.

1.Insert your windows xp installation CD in your CD or DVD drives.

2.Restart your computer. when it's boot up a screen with message “Press any key to boot from CD.."

3.You need to press any key to start the setup. If the “Press any key to boot from CD.." is does not appears,
    go to your computer BIOS, by rebooting it and press F2 or F3 or F8 or DELETE. (it should be one of them) enable the “Boot from CD” setting.
 4. After you enter the setup, the CD will load up a blue screen and will start loading operating system files (this make take few minutes).
5. When it finishes, it will list a few options, “Press ENTER to set up Windows XP now” is the one we need. Click it.
6. Second screen is “The windows usage agreement”. It should be displayed now, showing that you need to press F8 to accept the agreement. Press F8 to accept.
7. If an existing Windows XP installation is detected by the system, you are prompted to repair it. If you want to repair your recent windows xp you can choose it. if not we will bypass it.
8.you need to select the partition where you prefer to install Windows Xp. This is where you will delete your partition and format drive C.Use the Up and Down Arrow keys to highlight/select your “C:” partition and press the F to format the partition.
9.Now a new screen prompted to choose where to install Windows. The box on the lower half of the screen should no longer show a partition, instead of “C:” you should see “Unpartitioned space xxxxxMB”. Select/highlight this with the arrow keys and press the “C” key to create a partition on the drive (this is where you will install windows). Setup tells you the minimum and maximum sizes the partition can use and lets you pick the size. The default size is the maximum available, leave the default value and press Enter.
10. This screen lets you choose the file system you prefer the drive to be formatted with. Choose NTFS “Quick” (recommended because NTFS is faster and more secure). Use the arrow keys to select and hit Enter.
11. Setup will start to and will auto-format the “C:” partition, and start with Windows XP installation. From here you are all set and the installation of Windows will proceed. This will take a while. The computer will reboot several times, and will continue with installation. Don’t remove the Windows XP setup CD, and "TAKE NOTE" don’t press a key when prompted it again.